I stressed over this question for WEEKS! The problem is that there is no easy way to do this in Blogger. You have to write your own HTML and CSS to get it working, and for me that isn’t a problem, but trying to explain it to non-coders is REALLY difficult. And then there’s the problem of me trying to code it for multiple different blog designs.. it just isn’t easy!
Then I found a great site that suddenly made my tutorial so much easier!
But keep in mind that you will still have to edit your template CSS and HTML a lot.
STEP #1: CREATE YOUR MENU
First, head on over to CSS Menu Maker and create your navigation menu! Pick one of the pre-made styles they have and click “Customize”. Then you can add links to the menu, drag them around, change the titles, and insert the URLs. For each menu item you have to put in the URL of the page. You will need to copy and paste this from your Blogger site!
When you’re done, click the “Download” button.
STEP #2: ADDING THE CSS
After hitting “Download”, you should have a .zip file on your computer. Unzip it so that you have access to the files inside. There should be a folder in there called “menu_assets” and a file called “style.css“. Open up that file in some kind of text editor (like Notepad, Notepad++, or Textwrangler). You will need to copy the code and put it on your blog. For now, leave it open in the text editor, and open up a new page to your Blogger blog.
You have to click on the tab to go to “Template”. Before we do anything, you need to back up your template! Since we’re editing code it’s really important that you back it up beforehand in case you make any mistakes and need to revert them. So, in the top right corner, click on “Backup / Restore“, and then click the button to “Download full template”.

Once you have your template backed up, click on the button to “Edit HTML”. Look for the bit of code near the top that looks like this:
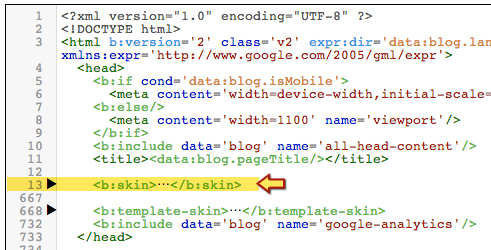
Click on the text that says <b:skin>…</b:skin> to expand it. Then scroll aaaaall the way down until you find the</b:skin> tag again.
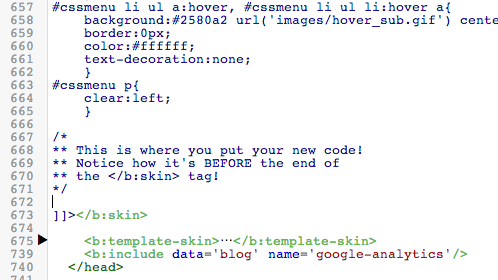
Make a new line BEFORE the </b:skin> line. This is where we’re going to put our first bit of code! So go back to your text editor with the style.css document and copy everything. Then, paste it in your template on that new line we made. Then, save your template. You might want to refresh the homepage of your blog to make sure nothing is broken.Nothing should look different after adding this code! So make sure everything is working as expected.
STEP #3: ADDING THE HTML
Next up, we have to add the HTML. Go back to the files you downloaded from CSS Menu Maker. There should be a file called instructions.html. Double click that file to open it in your web browser. Ignore all the instructions except for #3:
3. Copy and paste the html below where ever you want your menu to show up.
Copy all the text in the box below that line. This is your HTML! Now we just have to put it into Blogger…
THIS IS THE HARDEST PART OF THE TUTORIAL!!
This is literally one of the reasons why I dreaded writing this tutorial. The question is: where do we put the HTML? The answer: it depends on your template. That’s why this tutorial sucks. Even more so if you have a custom made template.. the HTML may vary. So, I’m sorry that this is so hard to explain because it seriously depends on where YOU want your navigation (above or below the header?) and what template you’re using.
On the Template page, click Edit HTML. Now you need to go digging through the template to paste the dropdown code HTML in somewhere. Yep, I’m not even joking. If you’re using a default Blogger template and want the dropdown above your header, a good place to put it is right below this line:
<div class='content-outer'>
Right below that, enter the dropdown HTML text.
Want it below your header? Here’s a good place:
</header>

<!--menu HTML goes right here-->

<div class='tabs-outer'>
Paste in the HTML where I’ve written “menu HTML goes right here”. In between the closing </header> tag and the <div class=’tabs-out’> tag.
No comments:
Post a Comment
bla bla bla